Skip navigation

Related softwares:

  1. Ubuntu 9.04
  2. Subversion 1.6.x
  3. Apache2

First, if you haven’t install Apache2 and Apache2-Subversion-library, you can do so by typing below:

sudo apt-get install apache2 apache2lib-svn

Then, edit the apache2-svn file in /etc/apache2/mods-available/dav_svn.conf.
Enter the following entry into the file and replace the variables with the square-bracket [xxx] with your value accordingly.

<Location [SVN_URL_PATH]>
DAV svn
SVNParentPath [SVN_PARENT_PATH]
AuthName "[SVN_REPOSITORY_NAME]"
AuthUserFile [AUTHENTICATION_FILE_PATH]
Require valid-user
</Location>

If you wish to have the repository URL such as http://hostname/svn, then replace the [SVN_URL_PATH] with /svn. Replaced the [SVN_PARENT_PATH] with the parent path of your Subversion repository. If you place your repository named projects in /var/www/svn_root/projects, then replace it with /var/www/svn_root. Replace the [SVN_REPOSITORY_NAME] with any name that you wish. Lastly, replace [AUTHENTICATION_FILE_PATH] with the absolute path of your authentication file, which we will create later. Let say we will create the file in /var/www/svn_root which named mypasswd. Then replace it with /var/www/svn_root/mypasswd.

To create the authentication file with a user named dhydrated, type the following:

htpasswd -c /var/www/svn_root/mypasswd dhydrated

To modify existing authentication file with a user named dhydrated, type the following:

htpasswd -m /var/www/svn_root/mypasswd dhydrated

Restart your Apache2 server by typing:

sudo /etc/init.d/apache2 restart

If everything went well, you should be able to access your repository via http://hostname/svn/projects, and a dialog box will be prompted to ask for your username and password as you put in the authentication file.

As the time of writing, I’m using Ubuntu 9.04 (Jaunty) and Subversion 1.6.

At the moment, Ubuntu package only provides Subversion up to version 1.5.x. To get the latest Subversion 1.6.x, you need to tweak a bit your sources.list. This will get the Subversion 1.6 from Personal Package Archive (PPA).

echo 
'deb http://ppa.launchpad.net/anders-kaseorg/subversion-1.6/ubuntu 
jaunty main' >> /etc/apt/sources.list

If you don’t have the permission to do so, you have to change to the root user by typing the command below:

sudo -i

After finished with editing the sources.list, exit the root user and go back to your normal user by typing below:

exit

Then you need to authenticate the above PPA, by typing below.

sudo apt-key adv --keyserver keyserver.ubuntu.com --recv-keys 413576CB

Then update your package list:

sudo apt-get update

Then you can start installing Subversion 1.6:

sudo apt-get install subversion

After finished installing, check your Subversion version by typing below:

svn --version

At the time of writing, I’m using UbuntuĀ  9.04 and Postgresql 8.3.
To start installing Postgresql, just type below apt-get command in the terminal:

sudo apt-get install postgresql-8.3

Then you need to change the default Postgresql user named postgres. To do so, you need to login as postgres Ubuntu user. Type the following command to login into Postgres console as postgres user.

sudo -u postgres psql postgres

This will get you into Postgresql console. In order to change the default postgres password, type below in the terminal:

/password postgres

Postgresql console will ask you to enter the new password twice. To quit from the Postgresql console type the following:

/q

This change requires your Postgresql server to be restarted. Type the following command:

sudo /etc/init.d/postgresql-8.3 restart

To make your life easier when working with Postgresql, you might want to install the GUI-client called pgadmin-III. In the terminal, type the following:

sudo apt-get install pgadmin3

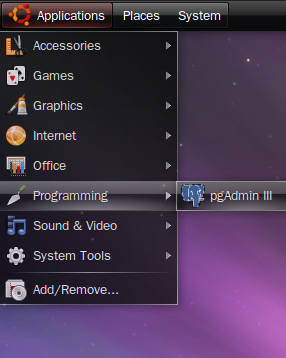
Once pgadmin-III is installed, you should be able to see the pgadminIII menu in your Ubuntu main menu as shown below.
screenshot_001

Traditionally, creating a new Java project is very cumbersome and time consuming, especially when you required a lot of external libraries. I might have to go to each library’s project website to search and download the jar file. Most probably I might just copied from previous project’s libraries.

Maven and Eclipse help me to avoid this mundane work. The feature of Maven with Eclipse I like to demo right now is the ‘Search for dependency from central repository’.

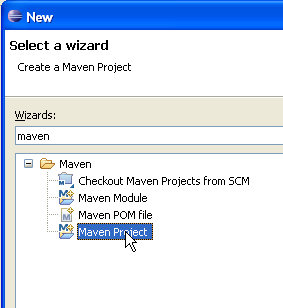
First, you need to do is create a Maven Project like below.

Create New Maven Project

Create New Maven Project

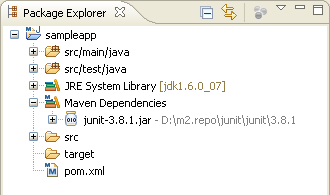
Then you will have the new Maven project in your package explorer. New project will consists of JUnit library by default.

Maven Project in Package Explorer

Maven Project in Package Explorer

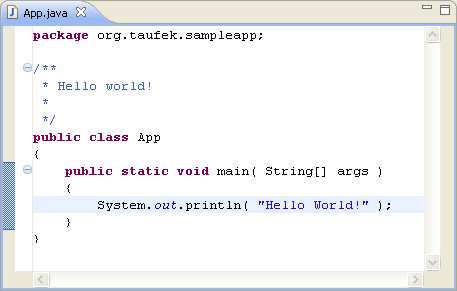
It will also comes with App.java class by default. I will use this java class for the demo.

Standard App.java

Standard App.java

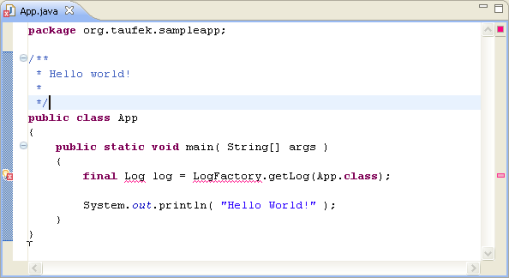
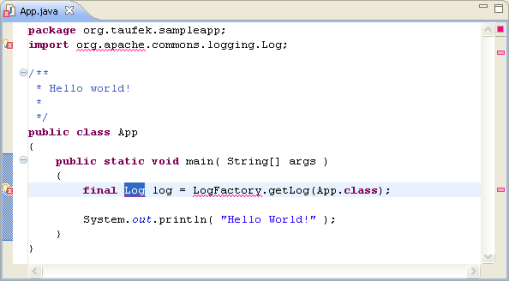
Let’s say I need to use commons-logging library, which is not yet included in the project’s classpath. I just typed in the code and of course I will get the errors as below.

Added Log and LogFactory object.

Added Log and LogFactory object.

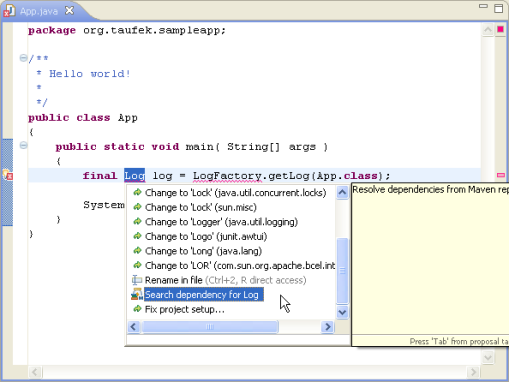
Next, I highlighted the ‘Log’ object and I pressed Ctrl+1 to pop out the context menu. Then, choose ‘Search dependency for Log’ option.

Search for dependency from context menu

Search for dependency from context menu

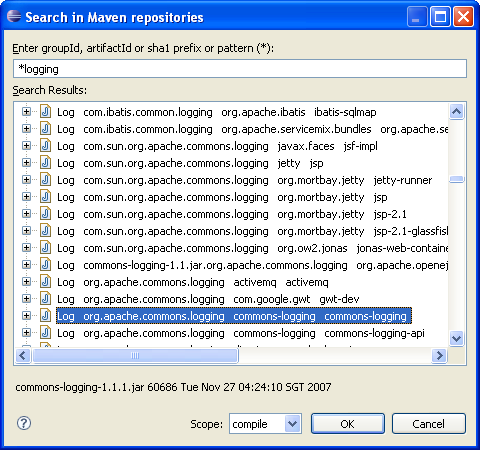
I typed ‘*logging’ to search for the specific Log’s library. It will search the maven central repository based on the pattern. Then, I select Log class from commons-logging artifact.

Choose specific library

Choose specific library

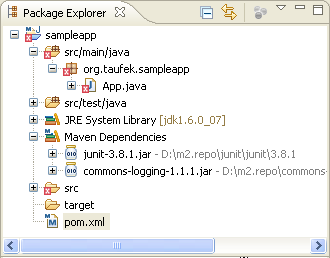
Automatically, commons-logging library will be in my project’s classpath.

Commons-logging jar file is added

Commons-logging jar file is added

Log class also will be automatically imported into App.java class.

Log object is imported

Log object is imported

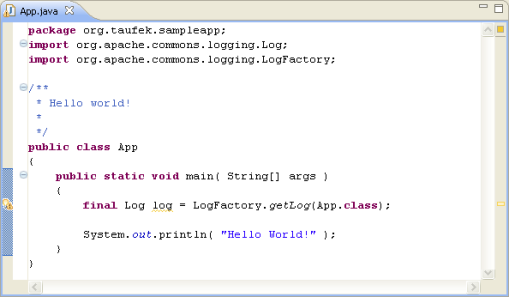
Since LogFactory class is from the same library, I just need to import the class by pressing Ctrl+Shift+O. This would solve all the problem and error.

Import LogFactory class.

Import LogFactory class.

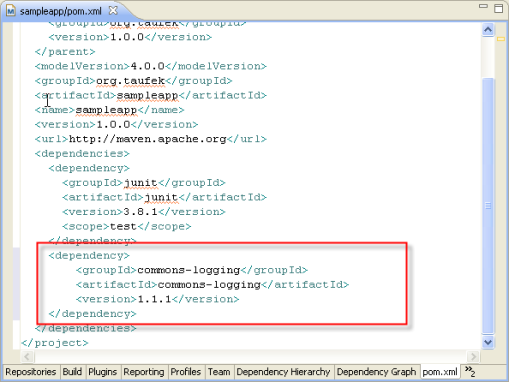
My pom file is also updated automatically.

POM updated

POM updated

Isn’t this a great feature? No more searching and downloading the libraries manually from the web. Hellooo productivitayyyy.

I’ve been a Java developer 6 years now and I never owned a Linux at home before. How embarrassing that is. Since I have an unused PC at home, I decided to start using one. There are so many flavors of Linux out there, but which one is the best for me? Easily, Ubuntu is the best choice for me. It is so easy to install and it is perfect for a beginner like me. Unlike those early years of linux where you have to memorize all those command lines to complete the installation, Ubuntu can be installed with several clicks of a button. I did it without reading any manual or documentation.

Login Page

Login Page

I’ve downloaded the Ubuntu version 8.10 and burn the image into a single CD. How come it has small footprint for an OS? The installation only come with basic functionality and it let the user to add on other features or packages from Ubuntu archive sites. But don’t underestimate it when I said it only comes with basic features. With basic installation, you will have the complete range of applications from media player, office suites from Open Office, FireFox browser, games, and a lot more other stuff. I was really impressed.

After completed the installation, I can customized my Ubuntu by downloading the packages from Ubuntu archive to suit my needs. Like myself as a developer, I would need stuff like maven2 and subversion. How do I get them? Well, I don’t believe it myself when I did it for the first time. To get these stuff installed, I just need to type below command:

> sudo apt-get install maven2

> sudo apt-get install subversion

After typing each of above command, Ubuntu will actually goes online to the Ubuntu archives and download the package together with dependency packages. There are thousands of these packages in Ubuntu archive to suit for many needs. Depending of what you need to do, I’m sure you can customize your Ubuntu to meet your needs. You can go to http://packages.ubuntu.com to check out the myriad of packages available.

Eclipse also can be installed easily with get-apt command line.

Eclipse also can be installed easily with get-apt command line.

So far my experience with Ubuntu has been great. I’m moving on to a better place now, it’s called Linux world. :)

Need to start a project in lightning speed? If you want to skip those dirty works in setting up a project framework, well…, I just found out a great utility just for that. It is called Appfuse 2. Now with version 2, it is tied together with Maven 2 which makes the setup a lot easier. The prerequisites for applying Appfuse is Maven 2 and MySQL 5. You need to install these 2 in your machine.
There are several archetypes you could choose from, and for the sake of writing, I just choose appfuse-basic-jsf. So I just run below command, it will create a project with JSF,Spring & Hibernate. There are also other persistence files included, such as JPA and iBatis.

mvn archetype:create -DarchetypeGroupId=org.appfuse.archetypes -DarchetypeArtifactId=appfuse-basic-jsf -DremoteRepositories=http://static.appfuse.org/releases -DarchetypeVersion=2.0.2 -DgroupId=org.dhydrated.appfuse.jsf -DartifactId=appfuseJsfWeb

Then, I need to tweak the pom according to my MySQL installation. By default, it uses root with no password as the MySQL user. So I just simply add my password in the pom file below.


<?xml version="1.0" encoding="UTF-8"?>
<project xmlns="http://maven.apache.org/POM/4.0.0" xmlns:xsi="http://www.w3.org/2001/XMLSchema-instance"
xsi:schemaLocation="http://maven.apache.org/POM/4.0.0 http://maven.apache.org/maven-v4_0_0.xsd">

<modelVersion>4.0.0</modelVersion>
<groupId>org.dhydrated.appfuse.jsf</groupId>
<artifactId>appfuseJsfWeb</artifactId>
<packaging>war</packaging>
<version>1.0-SNAPSHOT</version>
<name>AppFuse JSF Application</name>
<url>http://www.mycompany.com</url>
...
<properties>
...
<jdbc.username>root</jdbc.username>
<jdbc.password>password</jdbc.password>
</properties>
</project>

Then, I run below command and let Maven 2 do all the boring stuffs such as dependencies checking, creating tables in database and etc. It will take a while if you doing it for the first time.

mvn

Then, I need to package it into war, so I just simply run below command.

mvn war:war

Next, I need to tweak again the pom since I’m deploying the application into Glassfish 2 in my machine. By default, the application is set to run with Jetty or Tomcat. So if your choice of application server is one of these default settings, you can skip this step. I’ll add below maven plugin to enable me to deploy my application into Glassfish 2.


<?xml version="1.0" encoding="UTF-8"?>
<project xmlns="http://maven.apache.org/POM/4.0.0" xmlns:xsi="http://www.w3.org/2001/XMLSchema-instance"
         xsi:schemaLocation="http://maven.apache.org/POM/4.0.0 http://maven.apache.org/maven-v4_0_0.xsd">
...
    <build>
        <finalName>${artifactId}</finalName>
<plugins>
<plugin>
                <groupId>org.codehaus.mojo</groupId>
                <artifactId>exec-maven-plugin</artifactId>
                <executions>
                    <execution>
                        <id>deploy</id>
                        <goals>
                            <goal>exec</goal>
                        </goals>
                    </execution>
                </executions>
                <configuration>
                    <executable>C:/Program Files/glassfish-v2ur1/bin/asadmin.bat</executable>
                    <arguments>
                        <argument>deploy</argument>
                        <argument>--user=admin</argument>
                        <argument>--passwordfile="C:/passwordfile.txt"</argument>
                        <argument>--host=localhost</argument>
                        <argument>--port=14360</argument>
                        <argument>target/${artifactId}.${packaging}</argument>
                    </arguments>
                </configuration>
            </plugin>
            ...
        </plugins>
    </build>
    ...
    </project>

Above, I’m using exec-maven-plugin to run an executable command to deploy my war into Glassfish 2. In order to call above plugin, I typed below command.

mvn exec:exec

After that, you should be able to see your application is being deploy from your server console. After all these steps, Presto!, now you have a full-fledged Java Enterprise application running on your server. Thanks to Spring, it is also equipped with security and transaction management. Couple of users with specific roles are already included.

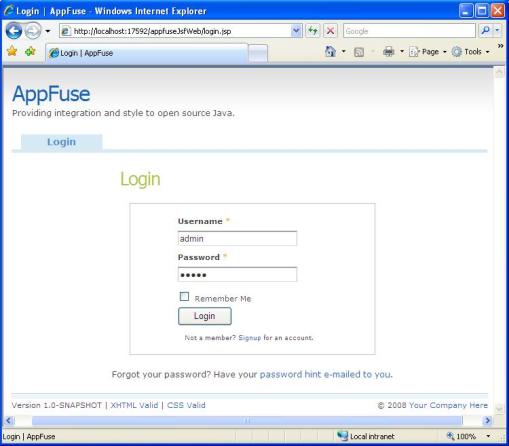
If I run my application, I should get the Login page as below.

appfuse-jsf-login

appfuse-jsf-login

Above is the login page. One of the default user is admin.

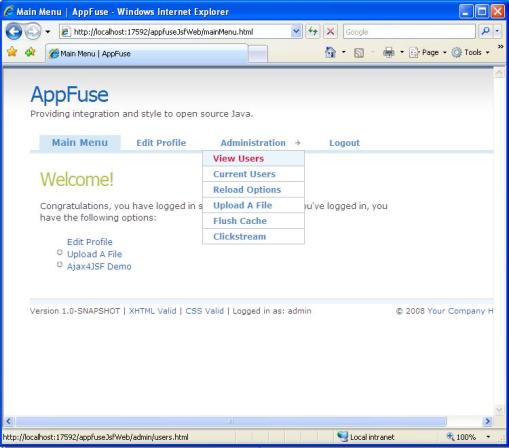
appfuse-jsf-home

appfuse-jsf-home

Above is the home page once you are logged in. It uses Struts-Menu for menu layout.

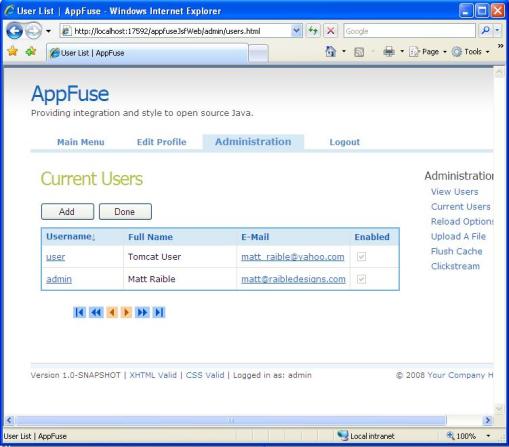
appfuse-jsf-users

appfuse-jsf-users

It also includes CRUD pages for Users.

How’s that for speed? It only took 10 minutes to create this application (if you know how to do it, of course). There are several other UI frameworks you could choose from, besides JSF. I guess the 2 most commonly used are JSF and Struts2. If I only knew about Appfuse 2, I would have used it on my last project. It is awesome. I don’t need to do all the basic stuffs anymore and I can just straight away focus on the business requirements. Yeah!

I was given a task to work on Ms Access database. I had to choose either JDBC, iBatis and Hibernate for the persistence mechanic. So I tried each of them to see which one is the best.

First, I worked with JDBC with Spring. Below is one of the query where I mapped the result to Country object.

public class CountryDaoJdbcImpl extends AbstractJdbcDao implements CountryDao {

    public List getAllCountries() {

        List countries = getJdbcTemplate().
                query(
                "SELECT * FROM Country_Code", new RowMapper() {

            public Object mapRow(ResultSet rs, int rowNum)
                    throws SQLException, DataAccessException {
                Country country = new Country();
                country.setCode(rs.getString(1));
                country.setName(rs.getString(2));
                country.setIsdCode(rs.getString(3));
                return country;
            }
        });

        return countries;
    }
}

It is easy to implement but the code is too verbose. Plus, if I have relationships between objects, the code will be more complicated and maintenance would be tough.

Then, I tried to implement iBatis with Spring. Below is the iBatis config for an object with a relationship with another object.

<?xml version="1.0" encoding="UTF-8" ?>
<!DOCTYPE sqlMap PUBLIC "-//ibatis.apache.org//DTD SQL Map 2.0//EN"
"http://ibatis.apache.org/dtd/sql-map-2.dtd">

<sqlMap namespace="General">
    
    <resultMap id="CategoryResultMap" class="Category" groupBy="categoryCode">
        <result property="categoryCode" column="categoryCode" />
        <result property="description" column="description" />
    </resultMap>    
    
    <resultMap id="SubCategoryResultMap" class="SubCategory" groupBy="subCategoryCode">
        <result property="subCategoryCode" column="subCategoryCode" />
        <result property="description" column="description" />
        <result property="categoryCode" column="categoryCode" />
        <result property="category" 
                column="categoryCode"
                select="General.getCategoryByCategoryCode" />
    </resultMap>
    
    <select id="getAllCountries" resultClass="Country">
        SELECT 
        country_code as code, name, isd_code as isdCode        
        FROM 
        country_code 
    </select>   
    
    <select id="getAllSubCategories" resultMap="SubCategoryResultMap">
        SELECT 
        sub_category_code as subCategoryCode,
        sub_category_name as description,
        category_code as categoryCode
        FROM 
        sub_category_code
    </select>  
    
    <select id="getCategoryByCategoryCode" parameterClass="string"
            resultMap="CategoryResultMap" >
        SELECT 
        category as categoryCode,
        description
        FROM 
        category_code
        WHERE 
        category = #value#
    </select>
   
</sqlMap>

Above is the iBatis config for a SubCategory object that has a Category object as a parent.

public class SubCategoryDaoIbatisImpl extends AbstractIbatisDao implements SubCategoryDao{

    public SubCategoryDaoIbatisImpl(DaoManager daoManager){
        super(daoManager);
    }
    
    @Override
    public List<SubCategory> getAllSubCategories() throws SQLException {
        return getSqlMapExecutor().queryForList("General.getAllSubCategories", null);
    }    
}

Above is the query made via SqlMapExecutor, but this doesn’t work with MS Access. When I migrated the database to MySQL, it worked fine. So, iBatis is a NO too for Ms Access.

My last resort was Hibernate with Spring. Below is my code for the same object above.

...

/**
* @author Taufek
*/
@Entity
@Table(name = "sub_category_code")
public class SubCategory extends AbstractEntity {

private Category category;
private String subCategoryCode;
private String description;

@ManyToOne(cascade = {CascadeType.PERSIST, CascadeType.MERGE}, fetch = FetchType.EAGER)
@JoinColumn(name = "category_code")
public Category getCategory() {
return category;
}

public void setCategory(Category category) {
this.category = category;
}

@Column(name = "sub_category_name")
public String getDescription() {
return description;
}

public void setDescription(String description) {
this.description = description;
}

@Id
@Column(name = "sub_category_code")
public String getSubCategoryCode() {
return subCategoryCode;
}

public void setSubCategoryCode(String subCategoryCode) {
this.subCategoryCode = subCategoryCode;
}
...
}

Above is the SubCategory object.

...
/**
* @author Taufek
*/
@Entity
@Table(name="category_code")
public class Category extends AbstractEntity{

private String categoryCode;
private String description;

@Id
@Column(name="category")
public String getCategoryCode() {
return categoryCode;
}

public void setCategoryCode(String code) {
this.categoryCode = code;
}

@Column(name="description")
public String getDescription() {
return description;
}

public void setDescription(String description) {
this.description = description;
}
...
}

Above is Category object which is the parent of SubCategory.

public class SubCategoryDaoHibernateImpl extends AbstractHibernateDao implements SubCategoryDao{

    public List getAllSubCategories() throws SQLException {
        return getHibernateTemplate().loadAll(SubCategory.class);
    }

}

Above is the query. It is simpler with Hibernate. I only need to put the Hibernate annotations on each property in an entity to map it to its counterpart in the database. Then, by using HibernateTemplate from Spring, just use one of the methods provided to make a query.

I thought, I was done with choosing persistence method, but whenever there is an object which has more than 1 relationship, the query will return error. I found out that whenever there is a query with a relationship, hibernate will construct a query consists of LEFT OUTER JOIN to combine between 2 tables. I was surprised to find out that MS Access query can only has 1 LEFT OUTER JOIN. If you run a query with more than 1 LEFT OUTER JOIN, it will return an error.

So now,I’m back to square one with ol’ JDBC.

Most of JEE’s MVC frameworks nowadays, requires a bit of learning on their XML configurations. Some might get frustrated when seeing those long list of XMLs in a project. But for me, XML configuration is easier to maintain and learn if you know where to look. Now, Struts2 has taken the next step, and their goal is zero configuration. There are not actually there yet, but they have done tremendous job on reducing XML configs. But if you are a fan of XML like me, you can still stick to XML configs.

Struts2 took advantage of Annotation to move those configurations from XML to Action class itself. The only XML you need to set is your ol’ trusty web.xml. You need to set the heart of Struts2 component which is the FilterDispatcher like below.


<?xml version="1.0" encoding="UTF-8"?>
<web-app id="WebApp_9"
         version="2.4"
         xmlns="http://java.sun.com/xml/ns/j2ee"
         xmlns:xsi="http://www.w3.org/2001/XMLSchema-instance"
         xsi:schemaLocation="http://java.sun.com/xml/ns/j2ee http://java.sun.com/xml/ns/j2ee/web-app_2_4.xsd">

    <display-name>Dhydrated's Fortune Teller Web</display-name>

    <filter>
        <filter-name>struts2</filter-name>
        <filter-class>
            org.apache.struts2.dispatcher.FilterDispatcher
        </filter-class>
        <!-- Scanning for annotation packages -->
        <init-param>
<param-name>actionPackages</param-name>
<param-value>org.dhydrated</param-value>
        </init-param>
    </filter>

    <filter-mapping>
        <filter-name>struts2</filter-name>
        <url-pattern>/*</url-pattern>
    </filter-mapping>

    <welcome-file-list>
        <welcome-file>index.jsp</welcome-file>
    </welcome-file-list>

</web-app>

There is nothing special about above settings but just note that within FilterDispatcher element, I’m declaring actionPackages with org.dhydrated value. Struts2 will scan through this java packages for Action classes.

Below is my first Action class called Index.java.


package org.dhydrated.sample;

import com.opensymphony.xwork2.ActionSupport;
import org.apache.struts2.config.Result;

/**
 * @author Dhydrated
 */
@Result( value="/pages/VisitorForm.jsp" )
public class Index extends ActionSupport{  

}

Above will be the first Action class to be hit when entering the application. From the index.jsp, I will just redirect by calling response.sendRedirect(“sample/index.action”);. Index action class will do nothing except redirecting to the VisitorForm.jsp. Below is my VisitorForm.jsp code.


<%@ page contentType="text/html; charset=UTF-8" %>
<%@ taglib prefix="s" uri="/struts-tags" %>
<html>
    <head>
        <title>Dhydrated's Fortune Teller</title>
    </head>
    <body>
<h4>Although I'm a fortune teller, please state your name</h4>
<s:form action="fortuneTeller">
            <s:textfield name="name" label="Your name"/>
            <s:submit/>
        </s:form>
    </body>
</html>

Below is the page being rendered.

On this page, I’m just trying to capture the user name and bind it to name property of FortuneTellerAction action class. When I submit this form, FortuneTellerAction action class will be executed. Below is my FortuneTellerAction action class.


package org.dhydrated.sample;

import org.apache.struts2.config.Result;

/**
 * @author Dhydrated
 */
@Result(name="SUCCESS", value="/pages/FortuneTeller.jsp" )
public class FortuneTellerAction {

    private String name;

    public String getName() {
        return name;
    }

    public void setName(String name) {
        this.name = name;
    }

    public String getFortune(){
        return "Howdy, " + name + ". Today's is your lucky day.";
    }

    public String execute() {
        return "SUCCESS";
    }
}

By now, above class already captured user’s data into name property. execute method will be called and redirect user to FortuneTeller.jsp page. This is set at the above code as @Result(name=”SUCCESS”, value=”/pages/FortuneTeller.jsp” ). FortuneTeller.jsp code is as below.


<%@ page contentType="text/html; charset=UTF-8" %>
<%@ taglib prefix="s" uri="/struts-tags" %>
<html>
    <head>
        <title>Dhydrated's Fortune Teller</title>
    </head>
    <body>
<h4><s:property value="fortune"/></h4>
</body>
</html>

Value fortune is referring to the getFortune() method from the FortuneTellerAction action class. The output of the page should be like below.
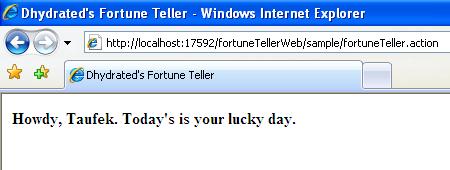

There are 2 points you should notice here. First, there are 2 ways of naming your Action class when using annotation. The Index action class extends Struts2 ActionSupport class, but the FortuneTellerAction action class does not. So, either you extends from ActionSupport class or end your action class with Action suffix, Struts2 will recognizes it as an Action class.

Second, if you recall, we set org.dhydrated as the annotation packages. My Index action class is under org.dhydrated.sample package. The value after org.dhydrated. will be treated as the URL namespace. So, the URL to call my Index action class is http://<host&gt;:<port>/<servlet-contextpath>/sample/index.action. And of course, there will be .action suffix for every Action class.

Annotation really helps to slam down the number of XML config files. But when the project grew bigger, it could get complicated when you need to browse through all the Action classes to understand your project flow. For me, XML is still the best way to put all your Action declarations and project flows. Usually, XML files is group within a same folder so that it is easy to find. Some IDEs have great visual editor that works with XML to simplify the process in building the configs.
After working with JSF for quite sometimes, what should I learn next? Naturally, it would be Facelets. It is a templating language which is suitable for JSF. Although, Facelets was build with JSF in mind but it is said that, Facelets is flexible enough to be use with other UI language besides JSF.

So, what are needed for Facelets to work? Glad you asked. Below are the libraries needed for running JSF with Facelets. As you can see, MyFaces have made into my top choice. But don’t fret about it, just swap MyFaces libraries with Sun-RI if you prefer the latter.

<project
    xmlns = "http://maven.apache.org/POM/4.0.0"
    xmlns:xsi = "http://www.w3.org/2001/XMLSchema-instance"
    xsi:schemaLocation = "http://maven.apache.org/POM/4.0.0 http://maven.apache.org/maven-v4_0_0.xsd">
    ...
    <dependencies>
        <dependency>
            <groupId>javax.servlet</groupId>
            <artifactId>servlet-api</artifactId>
            <version>2.5</version>
            <scope>provided</scope>
        </dependency>
        <dependency>
            <groupId>javax.servlet</groupId>
            <artifactId>jstl</artifactId>
            <version>1.2</version>
        </dependency>
        <dependency>
            <groupId>com.sun.facelets</groupId>
            <artifactId>jsf-facelets</artifactId>
            <version>1.1.13</version>
        </dependency>
        <dependency>
            <groupId>myfaces</groupId>
            <artifactId>myfaces-api</artifactId>
            <version>1.2.3</version>
        </dependency>
        <dependency>
            <groupId>myfaces</groupId>
            <artifactId>myfaces-impl</artifactId>
            <version>1.2.3</version>
        </dependency>
        <dependency>
            <groupId>commons-logging</groupId>
            <artifactId>commons-logging</artifactId>
            <version>1.1.1</version>
        </dependency>
        <dependency>
            <groupId>commons-beanutils</groupId>
            <artifactId>commons-beanutils</artifactId>
            <version>1.6</version>
        </dependency>
        <dependency>
            <groupId>commons-codec</groupId>
            <artifactId>commons-codec</artifactId>
            <version>1.2</version>
        </dependency>
        <dependency>
            <groupId>commons-digester</groupId>
            <artifactId>commons-digester</artifactId>
            <version>1.8</version>
        </dependency>
        <dependency>
            <groupId>commons-el</groupId>
            <artifactId>commons-el</artifactId>
            <version>1.0</version>
        </dependency>
    </dependencies>

</project>

Then, I need to amend the web deployment descriptor to include the JSF servlet. Facelets has a standard file suffix which is ‘xhtml’. Hence, context-param named javax.faces.DEFAULT_SUFFIX and JSF Servlet’s URL Pattern are set to .xhtml.

<?xml version="1.0" encoding="UTF-8"?>
<web-app version="2.5"
         xmlns="http://java.sun.com/xml/ns/javaee"
         xmlns:xsi="http://www.w3.org/2001/XMLSchema-instance"
         xsi:schemaLocation="http://java.sun.com/xml/ns/javaee http://java.sun.com/xml/ns/javaee/web-app_2_5.xsd">

    <context-param>
<param-name>javax.faces.DEFAULT_SUFFIX</param-name>
<param-value>.xhtml</param-value>
    </context-param>
    <context-param>
<param-name>facelets.SKIP_COMMENTS</param-name>
<param-value>true</param-value>
    </context-param>
    <context-param>
<param-name>com.sun.faces.verifyObjects</param-name>
<param-value>false</param-value>
    </context-param>
    <context-param>
<param-name>com.sun.faces.validateXml</param-name>
<param-value>true</param-value>
    </context-param>
    <context-param>
<param-name>javax.faces.STATE_SAVING_METHOD</param-name>
<param-value>client</param-value>
    </context-param>

    <servlet>
        <servlet-name>Faces Servlet</servlet-name>
        <servlet-class>javax.faces.webapp.FacesServlet</servlet-class>
        <load-on-startup>1</load-on-startup>
    </servlet>
    <servlet-mapping>
        <servlet-name>Faces Servlet</servlet-name>
        <url-pattern>*.xhtml</url-pattern>
    </servlet-mapping>
    <welcome-file-list>
        <welcome-file>index.xhtml</welcome-file>
    </welcome-file-list>
</web-app>

Next stop is the faces-config.xml file. Minimally, what I need to add is just the Facelets’ view handler as below.

<faces-config version="1.2"
              xmlns="http://java.sun.com/xml/ns/javaee"
              xmlns:xsi="http://www.w3.org/2001/XMLSchema-instance"
              xsi:schemaLocation="http://java.sun.com/xml/ns/javaee http://java.sun.com/xml/ns/javaee/web-facesconfig_1_2.xsd">
    <application>
        <view-handler>com.sun.facelets.FaceletViewHandler</view-handler>
    </application>
</faces-config>

After configuring the XMLs, then I can start working on the UI. Ideally, we will start by creating a template for all our pages. Facelets has a strict requirement which the page must be a fully XHTML-compliant. Working with IDE sure helps a lot in weeding out those pesky errors. Below is a simple template named template.xhtml.

<!DOCTYPE html PUBLIC "-//W3C//DTD
XHTML 1.0 Transitional//EN"
"http://www.w3.org/TR/xhtml1/DTD/xhtml1-transitional.dtd">
<html xmlns="http://www.w3.org/1999/xhtml"
      xmlns:ui="http://java.sun.com/jsf/facelets"
      xmlns:f="http://java.sun.com/jsf/core"
      xmlns:h="http://java.sun.com/jsf/html">
    <head>
        <title>Dhydrated's Well</title>
    </head>
    <body>
        <h:form>
                <ui:insert name="body-content">
                    Body to be replaced.
                </ui:insert>
        </h:form>
    </body>
</html>

As you could have guessed, Facelets tag has ui prefix. Above, I’ve created a hook on the template named body-content by using the ui:insert tag, which could be replaced by my JSF view. Now, lets create a JSF view that uses above template.

<!DOCTYPE html
PUBLIC "-//W3C//DTD XHTML1.0 Transitional//EN"
"http://www.w3.org/TR/xhtml1/DTD/xhtml1-transitional.dtd">
<html xmlns="http://www.w3.org/1999/xhtml"
      xmlns:ui="http://java.sun.com/jsf/facelets"
      xmlns:h="http://java.sun.com/jsf/html">
    <body>
        <ui:composition template="template.xhtml">

            <ui:define name="body-content">
                <t:outputText value="Value from JSF View" />
            </ui:define>
        </ui:composition>
    </body>
</html>

Above JSF view, uses ui:composition tag to state which template it referring to. Then, it uses ui:define to position it content in the template by matching it’s name with template’s ui:insert tag’s name. So when you run this view on the browser, Facelets will help to decorate the page based on the choosen template.

What I had shown above is just one of the benefits from Facelets. There are other great goodies from Facelets which are component composition (which is my favourite), customizable tag libs, extendable components and etc. It also helps to nicely interweave JSTL and JSP expression language (EL) together. Although, there are others templating utilities such as Tiles, FreeMarker, Velocity and SiteMesh, Facelets does has a good edge when applied with JSF.

Starting a new project is time consuming. You need to determine the technologies involved, build the project structure, setup the configuration files, work out the dependencies of jar files and etc. Before I had encountered Maven, I just used to copy my existing project, and start working from there. I need to add/delete, Java, jar and other resources files prior to starting a new project. With Maven came into the picture, I need not to worry about most of the tasks I just mentioned.

There are several ways you could start you project with Maven. But I choose to use the generate goal from archetype plug-in because it seems to be the easiest way to start a new project. Archetype is like a project template, where Maven has a set of predefined project templates we could choose from. If we do not specify a specific archetype, it would goes into an interactive mode, which is awesome. I would hate it if I need to remember those archetype names. Below picture, is how I run the generate task command.

When you hit the [Enter] key, you would get the archetype list as below picture.

From the picture above you could see, there are 44 archetypes you could choose from. For a simple webapp, I should choose number 18, which represents maven-archetype-webapp archetype. Key in number 18 and hit [Enter] key.

Then, you will be asked to enter your project details as below.

Console will ask you to confirm the given details as below.

Finally, Maven will start working in the background and produce below output in the console.

If you are running for the first time, it will check all dependencies and download it if necessary. Downloaded dependencies are stored in your local repository. By default, if you are installing Maven in Windows XP, it will be at C:\Documents and Settings\<user>\.m path.

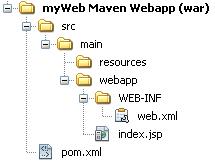
Now, Maven had created below project structure.

From here, you need to add more details to your pom.xml file to add more dependencies details in order for Maven to download the necessary jar files. By default, the pom.xml will be configured with JUnit the testing component.

Maven is a good utility to speed up and facilitate the building process of your application. It adopts standard approach so all projects has similar architecture. New developer, who just comes in to join a project, could easily get a good understanding of an application. Developer will requires less time on wading through specific configurations and project structure.

For those who are fan of Eclipse or NetBean IDE, there is a good news for you. Maven have plug-ins which enables it to be integrated with these IDE. Working with Maven through IDE, is much simpler than above mentioned process. :)